
Threejs provides a great deal of flexibility to visualize 3D models on the web. It allows you as the developer to import in gltf, glb, fbx or obj models easily exported from other 3D applications. But generally the exported model itself is not what you would want to visualize on a web page.
In order to provide an interactive experience, users often get hotspots on the 3D model. These hotspots are annotations outside of the 3D space and exist on the 2D space. Generally hotspots are added with the 3D model to highlight certain parts of the model being rendered. If you wanted to combine 2D HTML elements overlaid on to the 3D object hotspots is the way to go.
To provide interactive capabilities, these hotspot elements can contain the usual web events associated with an HTML element, such as click, mouseover, mouseout etc. Using these events you could allow the user to interact with the hotspots and see additional details of part of the model, change or update the model by interacting with the click event of the hotspot. In that sense, hotspots can be the initial facilitator for interactivity on the web.
The cool thing about using these annotations through threejs is that even though they exist in the 2D space, they are able to transform the position when a camera angle is changed. This is handled by Threejs, where Threejs itself is capable of mapping the coordinates from 3D space to 2D space.
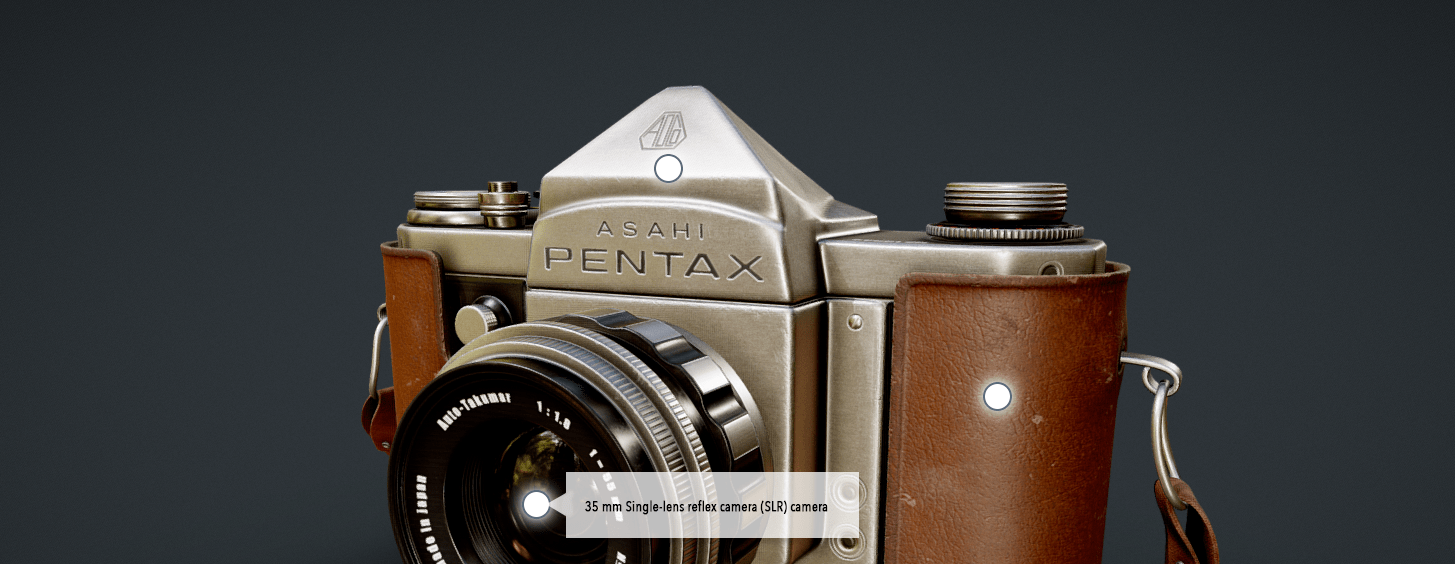
For this tutorial we would be using a free model imported from Sketchfab, designed by Robin Vandenberghe
A quick demonstration of the outcome of these annotated hotspots can be seen below. Feel free to rotate the model around and get a feel on what we are trying to acheive once it loads.
The Approach
The general approach to introduce hotspots would be the usage of the CSS2DRenderer – three.js docs. This is the recommended approach in blending HTML labeling with 3D objects. You could see the usage of the CSS2DRenderer through this basic example on the threejs website - https://threejs.org/examples/#css2d_label. In this example, you could see that the placement of the labels are relative to the model.The label is offsetted based on the positioning of the mesh. I feel that this approach has both pros and cons as outlined below.
Pros
- The programmatic approach makes positioning easier since its bound to the underlying mesh position.
- If the mesh position updates the annotated hotspot position is also updated with it.
Cons
- If there are many different 3D models integrated in your application each label needs to be programmatically added separately.
- 3D designers don't get visibility of hotspoting in their process.
The pros and cons outlined here could depend on what problem you're planning to solve. The main con here would be the lack of visibility and control for a 3D designer on the annotated hotspots during the creative process. Mainly this could introduce challenges since model updates and incremental changes to the models will require development effort to introduce new hotspots.
The approach we are going to look at aims at resolving this issue. Where the design has the ability to control the positioning and placement of the hotspots.
The Process
The process we are looking at is where a 3D designer can provide as much custom information as possible attached to the meshes as custom properties which allows the application to be generalized such that it becomes model agnostic and wouldn’t rely on the type of model and specific code tied to the model being rendered.
Let’s now dive in on how to get started with this approach. For this tutorial we will be using Blender to customize the models. Blender is an open source 3D graphics software which supports modeling, sculpting, VFX and animation.
Model Setup
First import the model on to Blender. We have used gltf as the format.

This should load up the model within Blender. If the model appears too dark or is not visually visible as in the image below, you could add additional lights, sky light, area or a point light to brighten up the perspective view.

Blender provides dummy objects which we would be using as positional markers to indicate where the models would be placed. This allows the designer to freely place the dummy objects on the model and control the position of them.
You can use Blender Empty objects to create dummy objects. As you can see below we have used a spherical empty object. Empty objects are not rendered out since they do not have any geometry associated with it.

But how would you specify which functionality is controlled and which underlying model would the dummy object be controlling? This is where we would be making use of custom properties provided for each mesh.
As you can see in the image below custom properties can be added which could be used to provide additional information to the application about the dummy object.

We have added the tooltip text as a custom property alongside the hotspot so that the tooltip could be dynamically loaded on the application.
Finally, we would be exporting the model to the gltf format and make sure to include the external data, so that the custom properties introduced will be preserved during the export.
Coding the Hotpots!
Let’s look at how the application can make use of the dummy objects and the external data that gets embedded with the model at the code level.
First we would be setting up the threejs codebase. The code below outlines the setup.
import * as THREE from "three"

import { OrbitControls } from "three/examples/jsm/controls/OrbitControls.js"
import { GLTFLoader } from "three/examples/jsm/loaders/GLTFLoader.js"
import { RGBELoader } from "three/examples/jsm/loaders/RGBELoader.js"
import { DRACOLoader } from "three/examples/jsm/loaders/DRACOLoader.js"
import { Color, Vector3 } from "three"
import {
  CSS2DRenderer,
  CSS2DObject,
} from "three/examples/jsm/renderers/CSS2DRenderer"
Generalizing the Application
We would now read the dummy objects and then introduce the HTML hotspots. We need to iterate through the meshes on import and we would extract the tooltip text from the dummy object user data section.
This code snippet shows how we filter the hotspots by traversing through the meshes and matching by part of the name.
const loader = new GLTFLoader();
loader.load("Camera.glb", function (gltf) {
  //Traverse through the meshes
  gltf.scene.children.forEach((child) => {
    child.traverse((n) => {
      // Find the hotspots
      if (n.name && n.name.includes("hotspot")) {
        // ...
      }
    }
  });
This code snippered outlines how we create the HTML 2D elements that would be placed in-place where the hotspot is located in the 3d spae and how the userData section is read to extract the data we embedded in the model through Blender.
const hotspot = document.createElement("div")
hotspot.className = "hotspot"
hotspot.setAttribute("name", n.name)

// Add a tooltip element
const tooltip = document.createElement("div")
tooltip.className = "tooltip"

// Use the custom properties embedded from Blender through the userData section.
tooltip.innerHTML = n.userData.tooltipText
hotspot.appendChild(tooltip)

const hotspotLabel = new CSS2DObject(hotspot)
hotspotLabel.position.set(0, 0, 0)
n.add(hotspotLabel)
hotspotLabel.layers.set(0)
Thats all folks! If you want more insights, have questions or need to provide a 3D virtual web experience for your ecommerce store online do reach out to us here and we can have a conversation.