
Pre-requisites
- Docker
- Git
- NodeJS - Optional
- Basic knowledge of ReactJS - We won’t be explaining React-related code!
What is Apache Superset?
Apache Superset is a Business Intelligence (BI) Web application that provides you with the ability to visualize data through the use of a variety of charts, and other tools, accessible from a Superset Dashboard. You can refer to their documentation for more information.
So in this blog post, we will first look at how to set up Apache Superset on your local machine, then see how we can embed a superset dashboard in the react app.
BONUS: We will explore TWO ways of embedding the dashboard and include troubleshooting tips along the way as well!

Setting up Apache Superset on Your Local Machine
We will first complete the Superset configurations for embedding the dashboard.
There are several ways to set up Superset but for the sake of simplicity, let’s try the quickest way to get it up and to run - that will be through docker.
Create a folder for this project at your desired location, let’s call it react-with-superset.
Run this command in your terminal:
The source code is a bit larger in size than the average, so if you want to save your internet quota (I’m in a country with inflation, if it makes sense) you can try Tip 01 (below).
You might also run into an error later at the second step, I recommend you to check the Troubleshooting Tip 01 first before running git clone to save you some time.
git clone https://github.com/apache/superset.gitThis will clone the superset repository which consists of the superset version in the master branch.
Our folder structure will look like this:
/tutorial
/superset
Next, go into the superset folder and run the following command to get superset up and running:
cd superset
docker-compose -f docker-compose-non-dev.yml up
If you want to run a different version, you can checkout to that version’s branch.
Now you can access Superset at the default configured URL: http://localhost:8088/
You can log in by using the default credentials - username: admin and password: admin. Go ahead and create a dashboard or you can use one of the existing example dashboards provided by Superset.
Superset source code is not needed, only the docker folder and the docker-compose.yml file are needed (non-dev mode or the other as you prefer). Here’s a way to get only the docker folder from the superset repository.
To clone only the docker folder in superset:
If it doesn't work the first time, delete the docker folder and run the last command again. If it doesn't work the second time either (some files are missing) then repeat the above and try again, this time it should work.
Are you getting the following error in the container logs after you try to up the containers?
This could most probably be caused by git if autocrlf has been set to true. To fix it, run:
This will tell git not to automatically convert CRLF (Windows) line endings to LF (Unix). Now run the above git clone command and the docker compose command again. Make sure you set autocrlf back to true if you want.
Setting up a React App
Let’s create a simple react app now and get it running as well.
npx create-react-app react-with-superset
cd react-with-superset
npm start
Our folder directory will now look like this:
/tutorial
/superset
/react-with-superset
Embedding your Dashboard into React
We will look at two approaches to this. First, let’s compare the two approaches, then you can select the one you prefer - or you can try both if you are curious.
Approach 1 - Using Superset Embedded SDK (An external library)
Approach 2 - Using a Custom Security Manager (By FAB)
Pros & Cons of Approach 1 - Using Superset Embedded SDK
✔️ More flexibility for role-based authentication
❌ You might run into errors on trying to set up
❌ More configurations required
❌ Time-consuming
❌ Have to depend on external factors such as an external library and a separate backend
❌ At the moment there is no known way of passing filters.
Pros & Cons of Approach - Using a Custom Security Manager
✔️ Very easy to set up and run in just a matter of few minutes
✔️ Fewer configurations
✔️ Less error-prone setup
✔️ No external libraries
✔️ Can use URL parameter-based filters or dynamic filters with templates like Jinja queries
❌ Might have less flexibility with regard to role-based authentication
Still here? Great! Here’s some motivation for you!

Approach 1 - Using Superset Embedded SDK
Enable Superset Embed Dashboard Feature
If you go to dashboard options, there is no embed dashboard option. To enable it, open superset_config.py (located inside docker/pythonpath_dev) - this file allows you to configure superset and add the following feature flag:
FEATURE_FLAGS = {..., "EMBEDDED_SUPERSET": True}Feature flags let you add optional features. To see what other feature flags are available you can visit:
Since we edited the superset_config.py file we will have to restart the superset-app container for the changes to get reflected. Now you will be able to see the enable dashboard option:

Click on it and a separate window will open:

Try adding http://localhost:3000 which is the default port of our React App. Only the added domains will be allowed embedding.
Once enabled, it will provide you with an id, we will need this id later. Please note it down for convenience. (Don’t worry, you can still access it)

If you run into some errors such as 403 later, try leaving allowed domains empty.
A related issue:
Creating a User
Next, let’s create a user with the roles Public and Gamma. “Public” is the recommended role (https://github.com/apache/superset/discussions/18814) for users accessing the dashboard from an outside source. You can add a new user by going to List Users option in Settings.

Make sure to check if adequate permissions for reading the dashboard and charts are available for the role ‘Public’ by going to List Roles option in Settings. In my Superset version, permissions have been set by default, if you don’t see any then please add the permissions.
You can also set ‘PUBLIC_ROLE_LIKE = "Gamma" in superset_config.py. This will let the public role have the permissions set in Gamma role. You can read more about roles here:
Here is an example permission set for your reference, however, please adjust as necessary.

Using Superset Embedded SDK in React
We will be using the following npm package:
https://www.npmjs.com/package/@superset-ui/embedded-sdk
Go inside the react-with-superset folder and run the following command in a console:
npm i @superset-ui/embedded-sdkIn the version I used, 0.1.0-alpha.8, there is an issue where files inside the switchboard folder are missing. To fix it, install the following version of switchboard or try downgrading to 0.0.1.0-alpha.7
Link to the issue:
Now copy the following code to your App.js
import { useEffect } from "react"
import { embedDashboard } from "@superset-ui/embedded-sdk"
import "./App.css"

function App() {
  const getToken = async () => {
    const response = await fetch("/guest-token")
    const token = await response.json()
    return token
  }

  useEffect(() => {
    const embed = async () => {
      await embedDashboard({
        id: "090ef4c7-d67b-4e94-ad55-e8f420617c20", // given by the Superset embedding UI
        supersetDomain: "http://localhost:8088",
        mountPoint: document.getElementById("dashboard"), // html element in which iframe render
        fetchGuestToken: () => getToken(),
        dashboardUiConfig: {
          hideTitle: true,
          hideChartControls: true,
          hideTab: true,
        },
      })
    }
    if (document.getElementById("dashboard")) {
      embed()
    }
  }, [])

  return (
    <div className="App">
      <h1>How to Embed Superset Dashboard into React</h1>
      <div id="dashboard" />
    </div>
  )
}

export default App
As you can see, the embedDashboard requires an id - replace the above id with the id of the dashboard you enabled to be embedded before. It also requires a guest token which will be provided by the Superset APIs. Continue to read on how to use a node backend to get this token. With it, you get automatically logged into the embedded dashboard from the front end.
If you want to edit the iframe styles used by the Embedded SDK, you can simply edit its CSS:
Adding the Security APIs
For my version of Superset, two APIs are required:

Note that some older versions require only the first one (guest_token).
Here is the link to the API documentation:
API | SupersetThe Backend - NodeJS
We will be using Node for our backend, you can use whichever you prefer. Setup a node project: Our folder structure will finally look like this:
/tutorial
/superset
/react-with-superset
/backend-node
Add the following code to your node script:
import express from "express"
import fetch from "node-fetch"

const PORT = 3001
const app = express()

app.listen(PORT, () => {
  console.log(`Server running on port ${PORT}`)
})

async function fetchAccessToken() {
  try {
    const body = {
      username: "admin",
      password: "admin",
      provider: "db",
      refresh: true,
    }

    const response = await fetch(
      "http://localhost:8088/api/v1/security/login",
      {
        method: "POST",
        body: JSON.stringify(body),
        headers: {
          "Content-Type": "application/json",
        },
      }
    )

    const jsonResponse = await response.json()
    return jsonResponse?.access_token
  } catch (e) {
    console.error(error)
  }
}

async function fetchGuestToken() {
  const accessToken = await fetchAccessToken()
  try {
    const body = {
      resources: [
        {
          type: "dashboard",
          id: "090ef4c7-d67b-4e94-ad55-e8f420617c20",
        },
      ],
      rls: [],
      user: {
        username: "guest",
        first_name: "Guest",
        last_name: "User",
      },
    }
    const response = await fetch(
      "http://localhost:8088/api/v1/security/guest_token",
      {
        method: "POST",
        body: JSON.stringify(body),
        headers: {
          "Content-Type": "application/json",
          Authorization: `Bearer ${accessToken}`,
        },
      }
    )
    const jsonResponse = await response.json()
    return jsonResponse?.token
  } catch (error) {
    console.error(error)
  }
}

app.get("/guest-token", async (req, res) => {
  const token = await fetchGuestToken()
  res.json(token)
})
In the newer version of the guesttoken API, an authorization header of type Bearer is required, so we pass the accesstoken received from the login API to this. Make sure to replace the id in the resources with your dashboard id and match the user values with the user you created.
You can add Row Level Security filters to ‘rls’ property. You can check their documentation for more information on RLS filters:
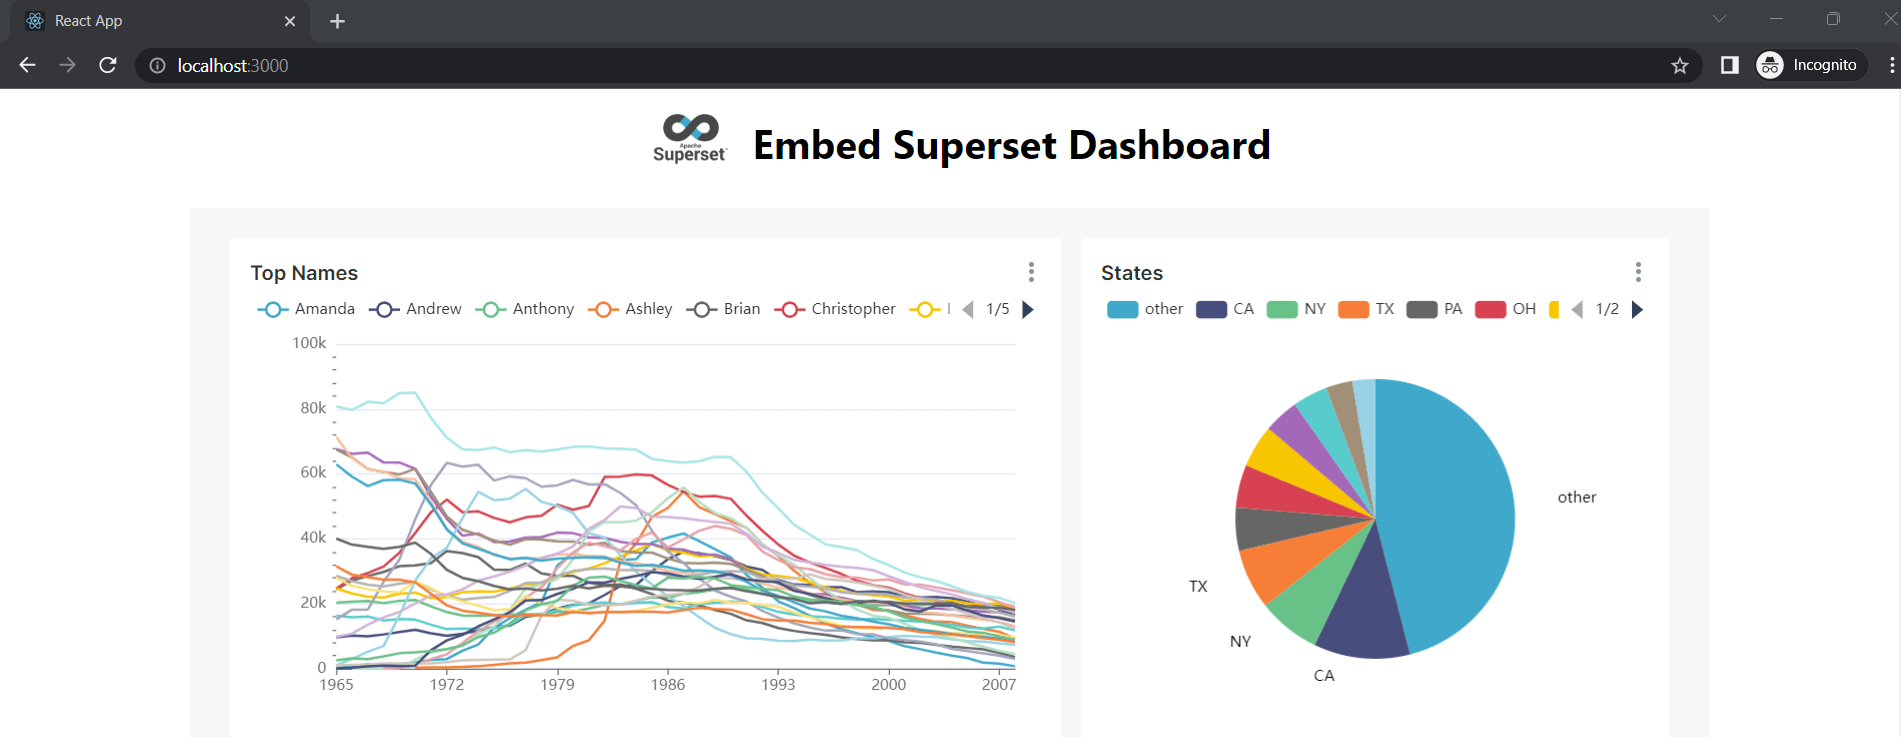
That’s it! Once you are done, you should see something similar to the below image:

Are you seeing 403 errors? Errors related to access denied or forbidden?
- Make sure to check if your roles have the required permission set.
- Try leaving the allowed domains empty in the embed dashboard window.
The following commented code lines might be helpful:
# ENABLE_PROXY_FIX = True
# HTTP_HEADERS = {'X-Frame-Options': 'ALLOWALL'}
# ENABLE_CORS = True
# CORS_OPTIONS = {
# 'supports_credentials': True,
# 'allow_headers': ['*'],
# 'resources':['*'],
# 'origins': ['*']
# }
Link to the issue:
Are you seeing an error related to flask login_manager and reload_user? Try changing your superset version to a newer one.
You can check this issue:
Are you seeing 404 errors for dashboard/charts/dataset?
Make sure you specified the dashboard id correctly everywhere required.
Approach 2 - Using a Custom Security Manager
Superset is built on top of FAB (Flask App Builder) and you can write a custom security manager to override the default SupersetSecurityManager.
Add the following code to superset_config.py:
from flask_appbuilder.security.views import expose
from superset.security import SupersetSecurityManager
from flask_appbuilder.security.manager import BaseSecurityManager
from flask_appbuilder.security.manager import AUTH_REMOTE_USER
from flask import  redirect, request, flash
from flask_login import login_user

# Create a custom view to authenticate the user
AuthRemoteUserView=BaseSecurityManager.authremoteuserview
class CustomAuthUserView(AuthRemoteUserView):
    @expose('/login/')
    def login(self):
        token = request.args.get('token')
        next = request.args.get('next')
        sm = self.appbuilder.sm
        session = sm.get_session
        user = session.query(sm.user_model).filter_by(username='admin').first()
        if token == '1234abcd456':
            login_user(user, remember=False, force=True)
            if (next is not None):
                return redirect(next)
            else:
                return redirect(self.appbuilder.get_url_for_index)
        else:
            flash('Unable to auto login', 'warning')
            return super(CustomAuthUserView,self).login()

# Create a custom Security manager that overrides the CustomAuthUserView
class CustomSecurityManager(SupersetSecurityManager):
    authremoteuserview = CustomAuthUserView

# Use our custom authenticator
CUSTOM_SECURITY_MANAGER = CustomSecurityManager

# User remote authentication
AUTH_TYPE = AUTH_REMOTE_USER
Please make sure to set the token using proper secure methods, this is just for example purposes.
Note the ‘next’ variable - we can pass our required URL parameters after the next= string in the URL. Make sure to restart the container after changes to this file.
Try setting AUTH_TYPE = AUTH_REMOTE_USER if you are getting a login page instead of being redirected to the specific dashboard.
Finally, add the following code, then import the Dashboard component in your App.js and simply use it.
import React from "react"

const Dashboard = () => {
  return (
    <iframe
      title="Dashboard"
      src="http://localhost:8088/login?token=1234abcd456&next=/superset/dashboard/11?standalone=3"
      width="100%"
      height="800px"
      sandbox="allow-same-origin allow-scripts"
    ></iframe>
  )
}

export default Dashboard
Here 11 is the ID of my dashboard, you can check yours by going to the localhost superset URL of your dashboard and checking the number in the URL.
With this approach, all you need is the superset_config.py file and your react app! You can even use Jinja templating for dynamic filtering through this approach.
“Really?,” you ask, “Why did I have to go through the pains of trying out the entire process of the first approach?”
“Well,” I reply casually, “I think the difference is stark clear when you go in that order!”
Thats all folks! If you want more insights, have questions or need help on data analytics or Apache superset support do reach out to us here and we can have a conversation.